
Ever faced difficulty in installing the Henry M-LOK aluminum handguard? Not anymore.
Henry rifles allow users to upgrade their standard rifles to use modern lights or lasers. And when it comes to installing Henry M-LOK aluminum handguards, it is modular, sturdy, and lightweight. For instance, 17 M LOK slots handguard square with Henry lever-action rifles 45-70, 38-55, 44, 45, 357, 30-30, 410 very well. Henry uses a double tenant system to accomplish the task.
To install the Henry M-LOK aluminum handguard all you need is:
- Small flat Screwdriver
- Punch
- Hammer
- Henry Screw
- Brass screw
- L-keymod
The Henry M-LOK handguard installation process is divided into 2 parts:
- Disassembly
- Assembly
DISASSEMBLY
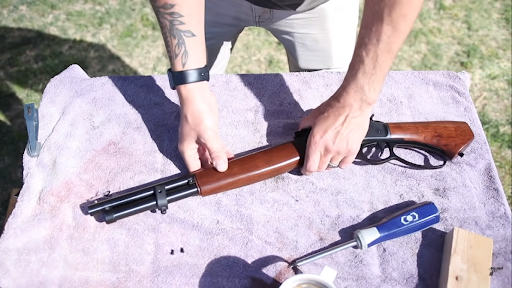
To start with disassembling, you need to remove the fore-end of the henry lever-action rifle. For this;
Step 1 – Make sure the gun is not loaded
Always unload the gun before disassembling it to avoid any accidental misfires.
Step 2 – Remove the magazine tube from the forward and set it aside.
Removing the magazine tube first would be quite tricky. As handguards just cannot come out on their own you will have to detach the fore-end retina first which is also known as slip stud mount. Unscrew it through the screwdriver from both sides. Then slide the curved retina forward to unfasten.
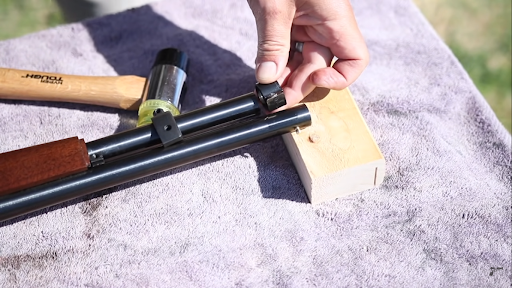
Step 3 – Remove magazine retina and concave
There is a concave that lies between the Magazine tube and dovetail. To remove the concave you need to punch out the dovetail magazine retina from left to right. To do so, set a block beneath the tip of the barrel. Though it definitely will need some serious force but to make this job easier, you should apply some firearm lubricant into the dovetail joint on both sides i.e. left and right. Let it soak for about a minute so that the lubricant penetrates well.
Then you just need to use a 330 seconds punch. This step may lead to some scratches on your rifle. If you are concerned about the same, you need to be extra careful. Put your punch right on the magazine retina in the dovetail drawing and hit the hammer. You will need to apply all the pressure on it. Yes, you read it right, you need to hit hard.
Bang on! The magazine retina is detached. The lubricant makes the process easy, doesn’t it? Now if you look at the top of the magazine retina, you could notice the number mentioned on it. As mentioned in the image, the number is 45-70 that shows the part is the same which Henry rifle uses.
Now you can just make a bigger room by pressing the finger in between the two tubes. Pull the magazine tube forward. Put the punch on the concave with the help of the hammer and shove it. Here you go, the concave drops out. You can slide out the fore-end swiftly.

ASSEMBLY
Finally, it’s time to install the M Lok handguard.For this, you need to have the handguard, the nut and screw kit, and the above-mentioned assembling accessories.Assembling is the reverse of disassembling. So here we go:
Step 1 – Fit in the concave and handguard
To put the handguard back to the rifle; reverse the rifle. Apply the liquid marker to the ejection side. Be mindful, as the sides have reversed the right side is moved to the left side, fit in the concave and press it right into the middle.
Now reinstall the barrel nut at the edge and squeeze it in between the tubes with the help of the hammer. Settle it perfectly in between the magazine tubes.
To install the handguard, keep the two henry screws which have slightly longer threads aside, brass set screw, two included screws, and additional sling stud (but for the time being you may not need).
Set aside the ring and now you will need to
Step 2 – Fix in the M-LOK handguard
The M-LOK handguard has small oval openings that need to be fit inside the receiver. Slide it through the magazine tube. You need to apply a drop of a liquid marker on the screws themselves. Take out the L-keymod and fix the screw with its finger tight.
Make sure that the M-Lok is perfectly instilled. Let it dry for a few minutes so that the inner dovetail joint sets up properly.
Now to install the set screw at the lower portion of the M-LOK apply liquid marker than with L-keymod tighten up the snug. Later just check if all the screws are fixed properly with the help of L-keymod.
Slide back the magazine tube inside and you are done. Your Henry M-Lok Aluminum handguard is ready.

HIGHLIGHTS OF HENRY M-LOK HANDGUARD
- Henry handguard has 17 M-LOK Slots (5 on each side, 7 at the bottom), 4 standard QD Flush Cups (one on each side, two at the bottom), and 18 finger grooves per side in the handguard.
- For easier installation and precision, it has self-bedding, the padding on the receiver end.
- For convenience and confidence, it offers deep finger grooves beside the top of each side and rounded lower corners.
- When shooting from a rest, its flat bottom offers high stability whereas heavy-duty 17-4ph stainless steel tenon mount and screws hardware keeps it long-lasting and increases its load-bearing capacity.
- For a smooth comfortable finish, every Type III anodized 6061 aircraft-grade aluminum handguard is chamfered and trimmed.
WRAPPING UP
Hopefully, the above details were helpful to you and you could install the Henry M-LOK Aluminum handguard conveniently.