This article shares a step-by-step guide with you in tracking push notifications for React Native apps on your server. Read on!
Introduction
Tracking push notification status for React Native apps is quite daunting, as you need to play with coding and databases. While SDKs from the push notifications services such as firebase and Wonderpush provides you with a certain level of visibility into push notification status. This information is only accessible on the databases of the respective services. The functionality of the app is further constrained by the integration of service-specific SDKs. A mobile application can lose essential functionality if these capabilities change in the future.
Fortunately, push notifications events for a React Native app may be recorded and saved on your server. On both iOS and Android devices, JavaScript can handle the opened and received statuses when an app is in the foreground. The Android FCM service and iOS push notification service extension must be utilized to handle the same statuses on their respective platforms when an app is running in the background.
How to Get Started?
To get started, you should start with React Native first you can send and receive push notifications, and the endpoint must be like-
PUT/API/notifications/status that can accept the user ID.
To let you understand this tutorial, I have shared the best example of the Github Repo. This leverages firebase as the database and firebase cloud to handle messaging and notifications. While a simple React Native app can send and receive notifications. You must need to set up your firebase project and enable iOS push notifications using the Apple Developer account.
On iOS, you can find a field called mutable-content, it also is set. Moreover, notifications will need to be attractive, so that it pushes service extension. Besides, in firebase messaging, mutable content is set with a separate object.
The firebase/functions/index.js file is the perfect example of the same. However, firebase requires sending different payloads per platform.
In the Github repo, we have posted the title, recipient, and message to firestore. Every time a new document is added to the notification’s collection, a cloud function and the event handler are configured to deliver a firebase message.
Note that the firebase iOS/android SDKs aren’t available in the background services. But we have firebase, and we can use its cloud functions to create HTTP callable endpoints to update the notification “receive” status. One example of redo is it includes these firebase functions that can be deployed to an empty firebase project.
Giving Response to Notifications in the Foreground
When the app is running in the foreground, service extensions can handle the “received” status. But we will have to handle the “opened” case manually.
React Native Push Notifications
This allows you to catch the “opened” event both when a notification hit the app to open, and when the app is already running in the foreground.
import Notifications, {
NotificationsAndroid,
PendingNotifications,} from ‘react-native-notifications’;
class MyComponent extends Pure Component { constructor(props) {
super(props);
if (Platform.OS === ‘android’) {
NotificationsAndroid.setNotificationOpenedListener(
this.onOpenedNotification,
);
} else {
Notifications.addEventListener(
‘notificationOpened’,
this.userOpenedNotification,
);
}
}
componentDidMount() {
/* On android we need to specifically check if */
/* the app launched via notification */
if (Platform.OS === ‘android’) {
PendingNotifications.getInitialNotification()
.then(notification => {
if (notification) {
this.userOpenedNotification(notification);
}
})
.catch(e => {
/* handle error if needed */
});
}
}
componentWillUnmount() {
Notifications.removeEventListener(
‘notificationOpened’,
this.userOpenedNotification,
);
}
onOpenedNotification = notification => {
const data = notification.getData();
const { notificationId: id } = data;
const url = `${statusEndpoint}/${id}?status=READ`;
try {
await fetch(url, { method: ‘POST’ });
} catch (e) {
console.log(e);
}
};}
iOS notifications in the Background
Before the user responds to a notice delivered by an app running in the background, iOS and android both require service extensions to record the status of the received request. These service extensions must be implemented using native code for each platform; tracking notification data does not necessitate opening the app.
iOS Push Notification Service Extension
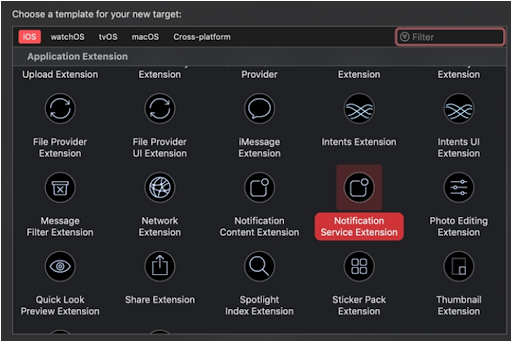
On iOS, tracking for the app notifications in the background is accomplished with the Push notification service extension. Xcode provides a template for this.
Follow the steps as under:
Step 1: Click the file and choose a new target.
Step 2: Choose the Notification service extension.
Step 3: Tap on next and give it a name.
Things You Should Consider About PN Service Extension
- Make sure the version name and build number should be matched that of your app while uploading to app store connect, otherwise the warning message will appear on the screen.
- You must set the target for the extension to match with your app, with a minimum of iOS 10.0, which is when service extensions were added.
- Once you sign up for your app manually, you’ll need to create a provisioning profile for the extension using the same certificate as the main app.
Now, we should need to target the project with the application name entered in the above steps and the new folder with NotificationService.m/h and Infor.plist files.
Open NotificationService.m
At this, we have two stubbed functions to implement. For example, we are going to alter the ‘didReceiveNotificationRequest’ function.
The other stubbed function, ServiceEXtensionTimeWillExpire, is used to manage the case when the extension is about to shut down, but the work is not finished.
Debugging
The service extension is configured by default to change the push notification’s title before the user sees it. Verify the title is changed when viewed on a device and then leave this code alone. Even after the app has been forcibly closed, this ought to take place.
As an alternative, you can use Xcode to establish a breakpoint. We must start the extension rather than the app to reach a breakpoint, and adhere to the procedures below.
Step 1: From Xcode, choose the PN service extension in the top left run bar.
Step 2: Click run/debug.
Step 3: Choose the major app for the project (this will launch the app from your device).
Step 4: Set the breakpoint ‘didReceivedNotificationRequest’ file.
Step 5: Send the push alert from the getting started option.

App Groups
We will need certain information from the main app to communicate to the API which user has got the notification. Information is probably kept in Redux or a similar statement management framework in React Native, which is not reachable from the service extension. We must write the user data in a low-level format to access: UserDefaults.
First, enable the app groups’ capability in Xcode. Then, add the app group capability in Xcode and give it the name. Remember, Xcode must add this capability to the provisioning profiles, but sometimes it needs to be added in the apple developer certificates manager via the web browser.
Next, we need to write to UserDefaults with JavaScript in React Native. Use the Reach native default preference library. In this example, we are making an assumption our/api/notifications/status endpoint is public and that we are sending notifications to one user at a time. To make the APO secure, if we were to implement this functionality in the real world, we would utilize an authenticated endpoint with an auth token. To keep the app and API up to date, the following should be executed each time a user registers and logs in.
When you get back in the service extension, the app needs to be read by the user data. In Objective C, it can be done with NSUserDefaults
– (void)didReceiveNotificationRequest:(UNNotificationRequest *)request withContentHandler:(void (^)(UNNotificationContent * _Nonnull))contentHandler {
self.contentHandler = contentHandler;
self.bestAttemptContent = [request.content mutableCopy];
/* new code */
NSUserDefaults *userDefaults = [[NSUserDefaults alloc] initWithSuiteName:@“group.myApp”];
NSString *endpoint = [userDefaults stringForKey:@“endpoint”];
/* More new code will go below */
self.contentHandler(self.bestAttemptContent);}
The example application shared in the Github repo allows the user to manually enter a mock user ID. To test the process, follow the given steps.
Step 1: Run the app and sign in a user.
Step 2: Set the breakpoint after the UserDefaults read status.
Step 3: Send a notification.
Note- enter the userID which matched with the userID that is displayed.
Making the Network Request
It’s time to send the notification status data to the API. So, first, grab the notification ID out of the requested content. The following worked with firebase; however, some services can use it as a different data structure.
NSString *notificationId = [request.content.userInfo valueForKey:@“notificationId”];
Then, we can use NSURLSession to make the HTTPS request.
NSString *urlStr = [NSString stringWithFormat:@“%@/%@?status=RECEIVED”, endpoint, notificationId];
NSURL *url = [NSURL URLWithString:urlStr];
NSMutableURLRequest *req = [[NSMutableURLRequest alloc] init];
[req setHTTPMethod:@“POST”];
[req setURL:url];
[[[NSURLSession sharedSession] dataTaskWithRequest:req completionHandler:
^(NSData * _Nullable data,
NSURLResponse * _Nullable response,
NSError * _Nullable error) {
NSString *responseStr = [[NSString alloc] initWithData:data encoding:NSUTF8StringEncoding]; NSLog(@“Data received: %@”, responseStr);
}] resume];
Now, we should be ready for the closed-loop test. So, run the app again and send a notification. The server should receive the expected ‘received’ status for the notification we sent.
Android Notifications in the Background
Assume that the app is using the React Native Push Notifications. So, we are leveraging to manage the notifications in the foreground, the Android FCM is already handling the services. To access the notification data we should override and reconfigure the service.
In manifest.xml, add the following in the application tag.
android:name=“.MyAppFcmListenerService”
android:exported=“false”>
Next, you need to implement the custom service MyAppFcmListenerService. Create the file called MyAppFcmListenerService and override the one used by react native notifications. Remember to call super, thus you can continues work.
import com.wix.reactnativenotifications.fcm.FcmInstanceIdListenerService;public classMyAppFcmListenerServiceextendsFcmInstanceIdListenerService {
@Override
public void onMessageReceived(RemoteMessage message){
super.onMessageReceived(message); /* call rn-notifications service */
/* the rest of the code will go here */
}}
Now you should be able to run the app in debug mode and set a broken point in the new service that will soon be going to hit the notification sent. Now, check the shared data and sent it to API.
If you see the app isn’t using react native push notifications, extend firebaseMesaggingService rather.
Reading Shared Data
On Android, services, and activities help helpers that allow the app to read and shared data among other features. For this, we will use this.getSharedPrefrences.
SharedPreferences prefs = this.getSharedPreferences(“group.myApp”, MODE_PRIVATE);
String endpoint = prefs.getString(“endpoint”, null);
Also, we need to grab the email ID.
Bundle bundle = message.toIntent().getExtras();
String notificationId = null;
if (bundle != null) {
notificationId = bundle.getString(“notificationId”);}
We will need an email id to send the notification status to the server.
Making A Network Request in JAVA
If you want to keep things simple, we are leveraging vanilla libraries for handling network requests and JSON objects.
Use HTTP(s)URLConnection to send the data to the server.
try {
URL url = new URL(endpoint + “/” + notificationId + “?status=RECEIVED”);
con = (HttpURLConnection)url.openConnection();
con.setDoOutput(true);
con.setRequestMethod(“POST”);
int code = con.getResponseCode();
Log.d(LOGTAG, “Completed Push Notification Phone Home with status: “ + code);}catch (Exception e) {
/* handle error */
}
finally {
if (con != null) {
con.disconnect();
}}
You should be able now to send push notifications to the Android app and see the API status.
Check the Github repo to see the working setup with reach native push notifications and firebase.
The Bottom Line
Hopefully, you have understood the complete guide- on how to track push notification status for React native apps. However, if you need any kind of support or help call WonderPush as they are the leading react native push notifications, service provider.